You know what VPN? In these times of streaming and restrictions on access by region on the part of certain sites, the expression must certainly have passed through your eyes and ears, but it gives you an understanding of what you are dealing with and how to get a safe and reliable private connection, there are already five hundred others . Fortunately, we're here to help.
First, it is important to define what we are talking about. VPN an acronym for Virtual Private Network, or virtual private network; it is a web tool that allows users to connect to websites around the world through a secure, private and remote connection. Basically explaining, when you are using a VPN, all of your internet traffic is transferred to a server in another location, making your connection appear to be from somewhere other than what you are physically and thereby making the your “online user” is a little more anonymous.
What are the advantages of using a VPN, therefore? Well, we have some. The first one I just mentioned: because your traffic is “outsourced” to a remote server somewhere on the planet, your navigation becomes relatively more anonymous, creating an armor for possible species, trackers and other virtual trackers; browsing open or insecure Wi-Fi networks, such as shopping malls and cafes, is also more secure as long as the VPN you are connected to is reliable, of course.
In addition, because you appear to be in a different region than yours, you can access restricted content by location and, say, access a different version of Netflix with different catalog options although Netflix, specifically, is constantly working to block this (probably for pressure from the content distributors themselves).
Of course, the use of VPNs is much more widespread in countries with authoritarian governments, such as Russia or China, where the blocking of some types of websites and services is routine. Still, we can also use this type of tool in some cases, such as users who spend a lot of time on open networks, its use is even recommended.
So, let's see how to use a VPN on your Mac or iOS.
With a customer
The easiest way to connect to a VPN is through dedicated software. Generally, these services charge a monthly fee and offer a number of features, such as selecting the country / continent to which your traffic will be redirected, as well as automatic connection in most cases, simply grant permission to the program in question on your Mac. or iOS device and it takes care of all the technical part of the equation alone.
Below, we list some options with their main features and price:
- ExpressVPN: Self-titled the "leader of VPN providers", ExpressVPN has solutions for various platforms, including macOS, iOS, Android and Windows, in addition to browsers such as Chrome. It has monthly (US $ 13 / month), semiannual (US $ 10 / month) and annual (US $ 8.32 / month) plans, and we have a link with free 30 day bonuses, for those who are interested.
- NordVPN: offers coverage to up to six devices simultaneously, with service for macOS, Windows, iOS, Android, Chrome and Firefox. It has monthly (US $ 12 / ms), annual (US $ 5.75 / ms) or biennial (US $ 3.29 / ms) plans.
- StrongVPN: brings a 30-day satisfaction guarantee, “best available location” option and apps for all major platforms. $ 10 / month in the monthly plan or $ 5.83 / month in the annual plan.
- PureVPN: says it is the fastest VPN service in the world and brings, in addition to the large platforms, applications for more specific systems, such as Android TV, Kodi and Amazon Fire Stick. It has monthly (US $ 10.95 / ms), annual (US $ 4.92 / ms) and biennial (US $ 2.88 / ms) plans.
- ZenMate: in addition to the main systems and browsers, it brings extension to Opera, for browser users. US $ 10 / month in the monthly plan, US $ 9 / month in the semester and US $ 6 / month in the annual.
- TunnelBear: in addition to the applications for all the main platforms, it has as a differential its price plan based on traffic. There is a free version with a limit of 500MB of data per month, as well as a monthly subscription of US $ 10 / month with unlimited traffic, the annual plan costs US $ 5 / month.
- TorGuard: for those especially concerned with security, it offers extended protection options beyond VPN, such as anonymous email or anonymous proxy (to hide your IP). The VPN plan costs $ 10 / ms, while a package including the proxy costs $ 11.54 / ms.
- Kaspersky Secure Connection: under the seal of the famous antivirus company, it brings protection for up to five devices simultaneously on all major platforms. The attractive price: US $ 5 in the monthly plan or US $ 30 for an entire year (US $ 2.50 / month). It also has a free version, which offers up to 200MB of browsing.
Setting up your connection on Mac
All of the above options offer a utility for automatic connection, but other methods of accessing a VPN may require you to get your hands dirty and configure the server manually on your device, for example, you may work in a company and the department IT pass the data on to their VPN connection but do not provide connection software.
Fortunately, it's pretty easy to set up your private connection yourself.
- Open System Preferences.
- V “Network” area.
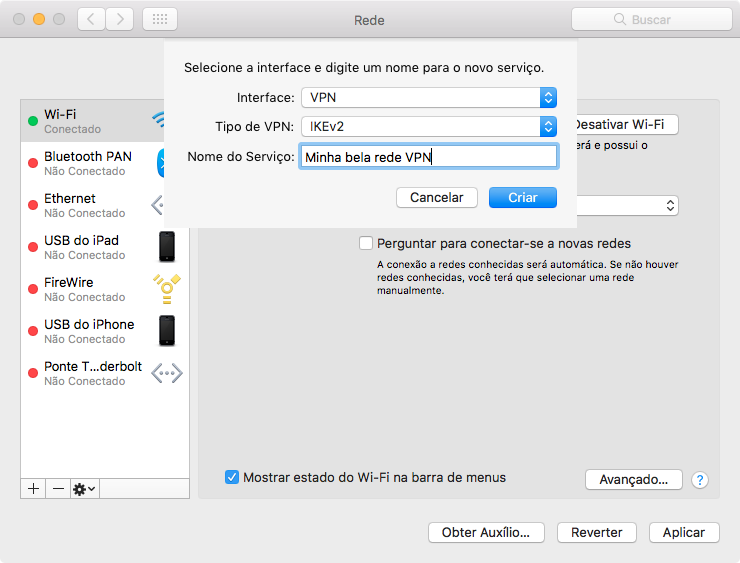
- In the left column, which lists available connections, click the plus sign (“+”) at the bottom.

- In the "Interface" field, select "VPN". In "VPN type", choose the type of server that was provided to you (in case of doubt, contact the provider). Finally, give your network a name in the "Service Name" field.
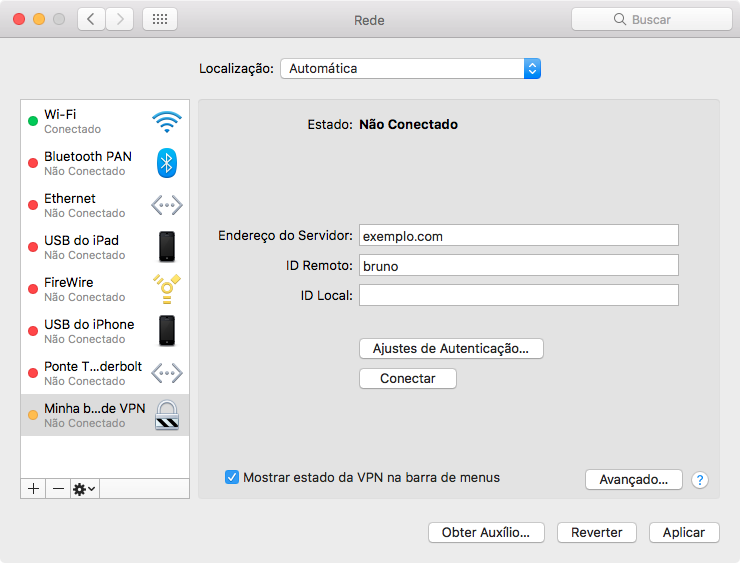
- On the screen that appears, enter the information provided by your provider: the Server Address and, depending on the type of server, the Username / Password or the Remote ID of the network. If necessary, click on “Authentication Settings” to enter additional data.

- Click "Connect". An icon will appear in your macOS menu bar indicating the connection.
Ready! Your Mac will be connected to your preferred VPN. It is good to note that if the connection goes down, the system will by default reconnect to another network, such as a Wi-Fi, for example; To eliminate the need to reconnect to VPN every time this happens, you can use a utility like VPN AutoConnect, which costs R $ 3.50 on the Mac App Store.
Setting up your connection on iOS
IOS has a VPN configuration process very similar to that of the Mac.
- Open the Settings.
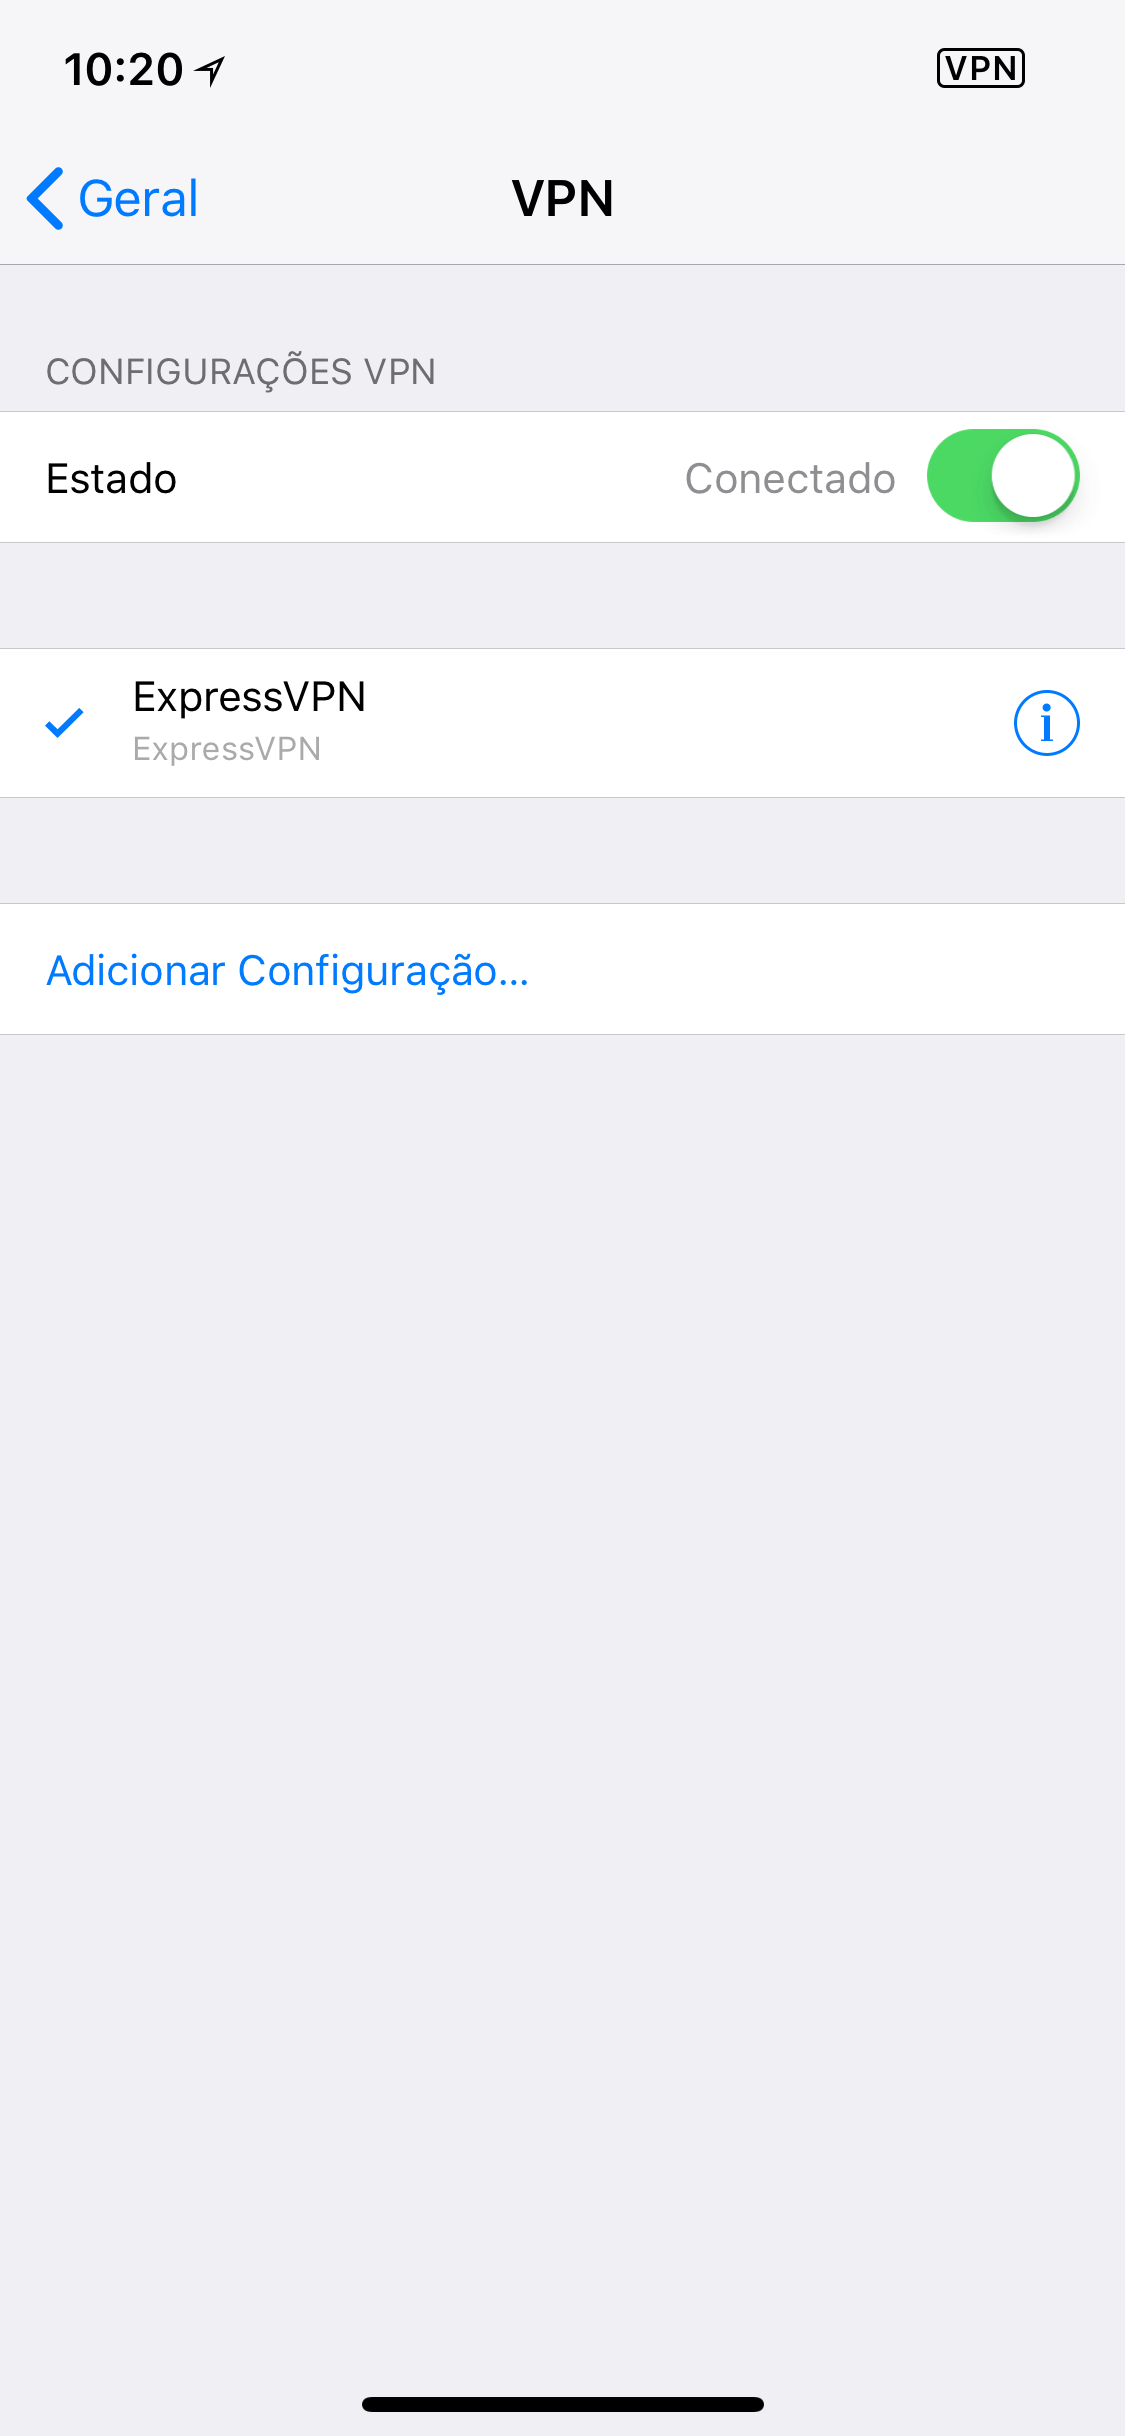
- In "General", scroll to the "VPN" option.
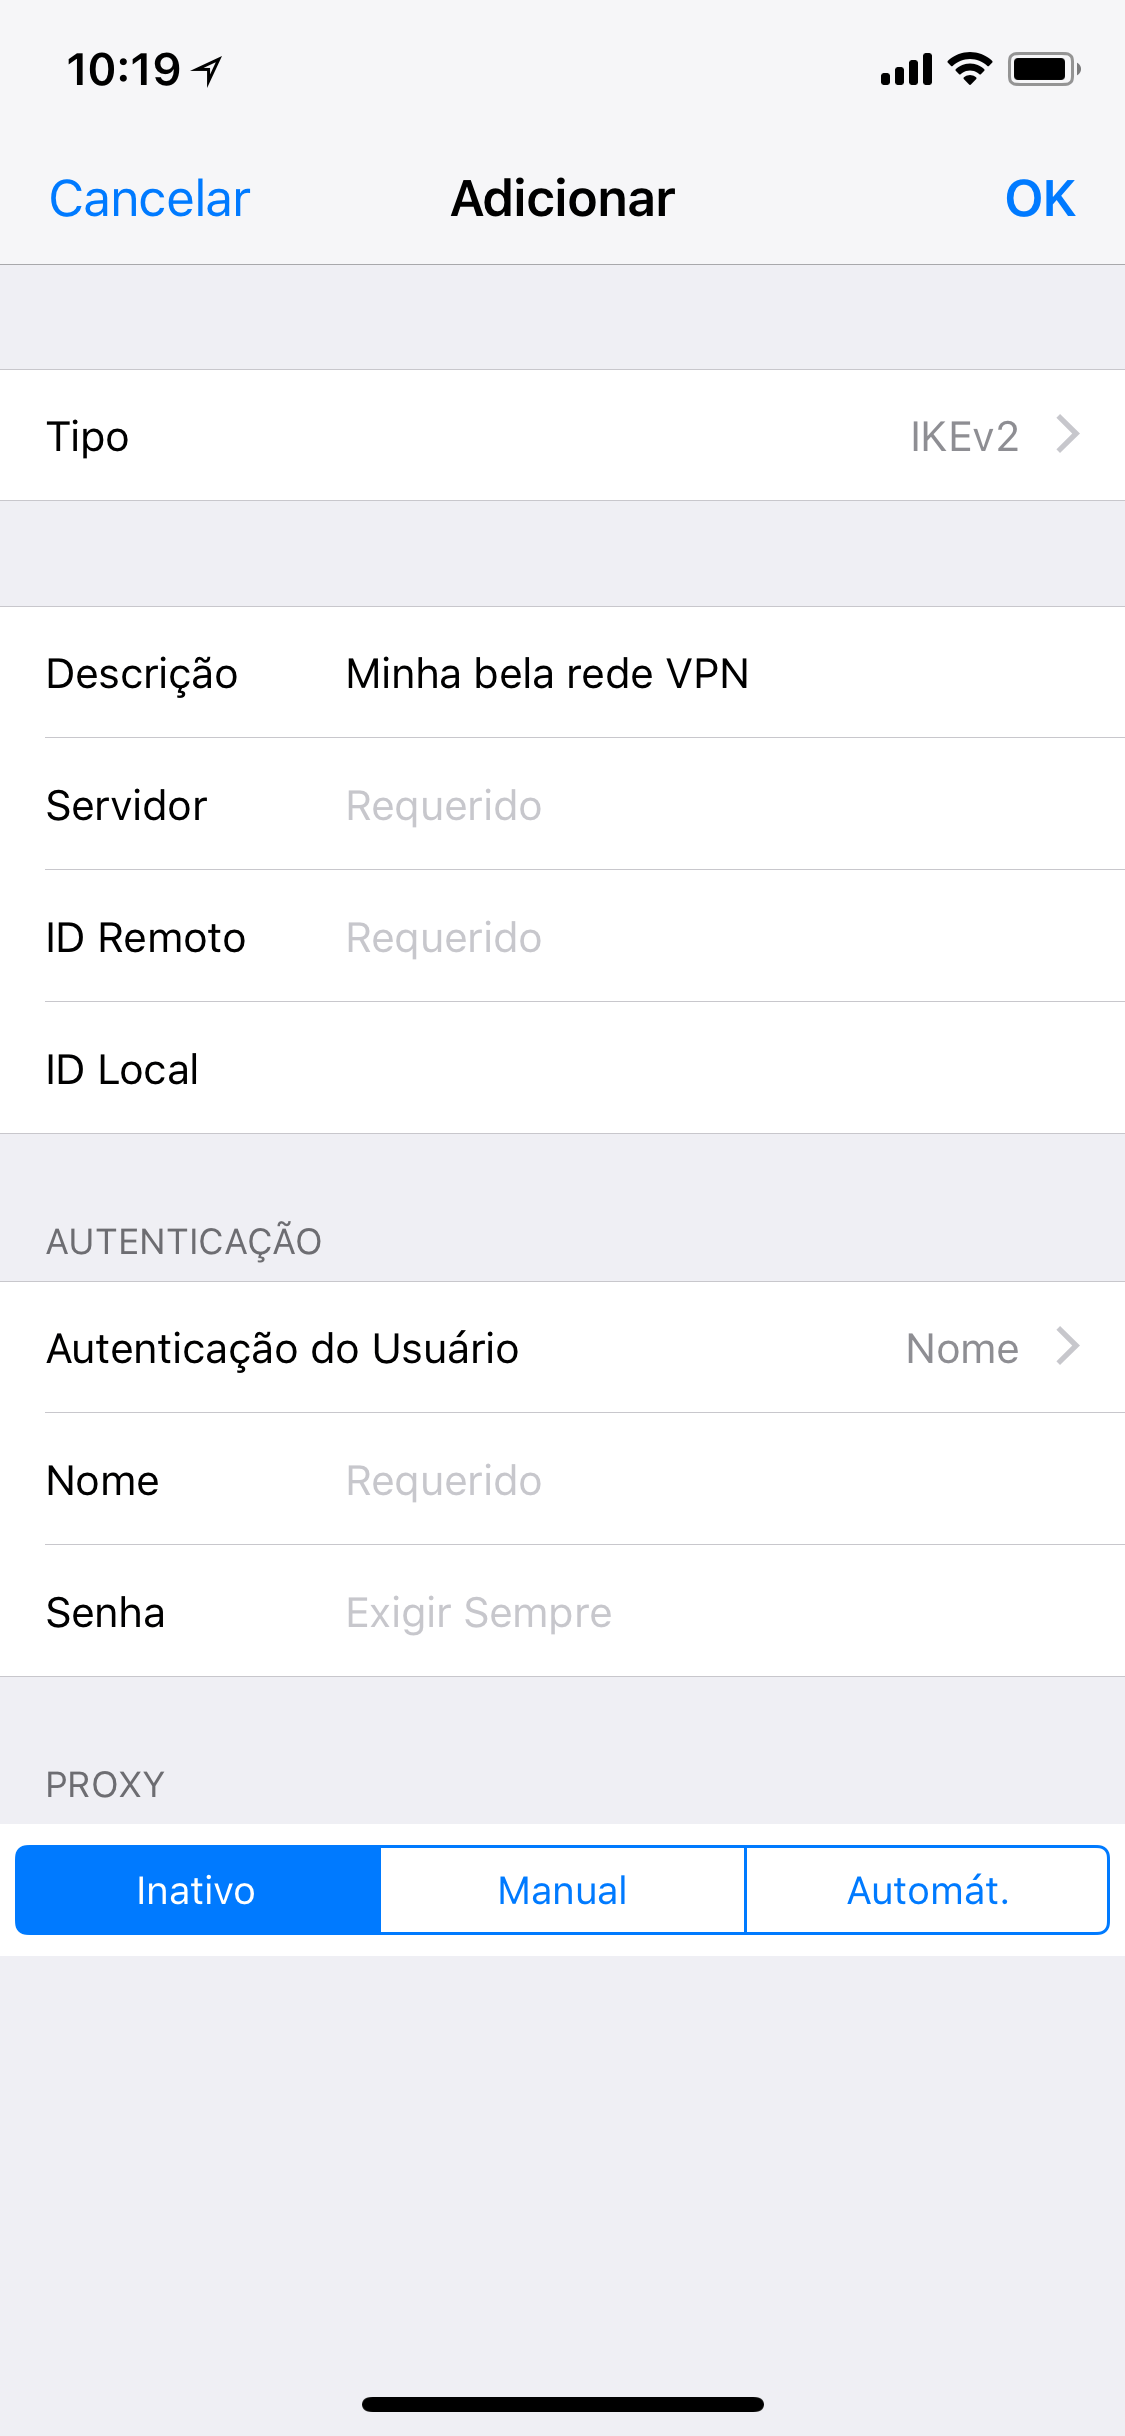
- Click on “Add Configuration”.

- Proceed as on the Mac, first selecting the type of server for your connection and then providing a description for your network and your access data to the server address and username / password or remote ID.
- Return to the previous screen and tap the desired network switch to connect to it. If everything is in compliance, a “VPN” icon will appear on the top bar of your device, indicating that you are on the private connection.

· • ·
Any more tips for the experience of surfing anonymously? Leave your contributions below.
