The USB debugging option enables advanced communication with a device. By connecting it to the PC, we can use programs that will interact deeply with the computer, allowing us to install applications, read system information, and enable root permissions. In this article I teach you what exactly, and how to enable USB debugging on your Android.
What is USB debugging?
Debugging the direct translation from English, debugging, which refers to the process of searching and solving errors in computer programs. Debugging or debugging, by extension, the development of a program or application. Traditionally, Android app development done with Android Studio on a computer. However, to test the application I need to pass it to a device where the code runs.
This is where the USB debugging option comes in. With it we can connect the smartphone with the computer, through a USB cable and test the application that is being developed.
Due to its own function, over time Android has decided to hide this option in the latest versions to prevent it from being used freely; use without knowledge in combination with a malware may cause major damage to the device. So pay close attention to what you install on your device.
What is USB debugging for?
USB debugging is designed to connect and share information between a smartphone and a computer. The tools used for this the ADB (Android Debug Bridge) for most smartphones, or manufacturer-specific programs such as Odin for Samsung devices.
Therefore, the first step in modifying some of your device software is to enable USB debugging, which opens the doors to root the device, install a custom recovery, install a ROM, or flash back the device's original operating system.
It's quite easy to enable USB debugging / AndroidPIT
And, as I mentioned before, USB debugging is the main tool for testing applications in development, so you can immediately see the changes we make to our app code. With USB Debugging enabled, you can use advanced software like Eclipse to program on Android, VRoot or SuperOneClick, as well as easily obtaining root permissions, and many other utilities.
How to enable USB debugging
Before enabling the "USB debugging" option, make sure that you have the device drivers installed on your PC. If you have no idea what the drivers are or don't know how to install them, read this article. Now you just need to connect the device to the PC and wait for it to be recognized. If all goes as planned, turn off the device and follow these steps to enable "USB debugging".
If you have a device running Android 2.3 or earlier:
- Open the Settings;
- Choice Apps;
- Comes Development;
- Enable the option USB debugging.
If you can find the "Developer Options" in the settings:
- Open it Developer Options and enable this option;
- Enable the option USB debugging.
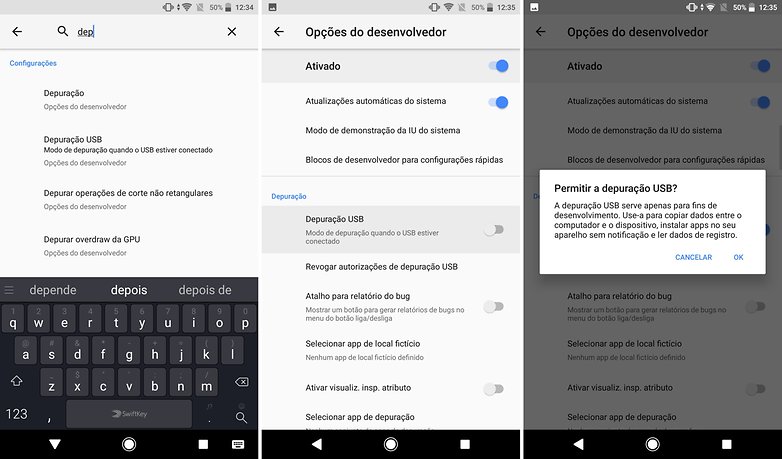
Options of USB Debugging / AndroidPIT (screenshot)
If you can't find this option, do the following:
- Open the Settings;
- Select About the device;
- Press 7 times Compilation Number / Build Version / Version Number;
- Go back to Settings;
- Choice Developer Options and enable it as well as extras;
- Enable USB debugging.
The process can obviously be undone by simply disabling USB Debugging on your device. You can also revoke any USB debug authorization from authorized computers. Just click on Revoke USB Debug Authorizations in the developer's options.
And you managed to enable USB debugging on your device?
. (tagsToTranslate) Android (t) AndroidPIT (t) USB Debugging (t) Enable USB Debugging
