We are in the holiday season, and nothing better than giving gifts to the people you love – or even being surprised by them. At that time, many people get new iPhones, iPads or other iGadgets and, if you already have any of these devices, know that transfer the data from the old device to the new one can be easier than you think.
It is worth noting that there are some different methods for migrating data between devices, either by iCloud, by the network Wi-Fi or else, using a wired connection connection from the Quick Start. Shall we check them out?
Transfer data through iCloud
To transfer data from one device to another via iCloud, it is necessary to activate the “Backup iCloud” option on the old device. If you have never configured this feature, you can do so at any time in Settings »Your Apple ID» iCloud »iCloud Backup» Backup Now.

This feature occupies both devices, so it is important to carry out the transfer at a time when you will not need to use the device for some time.
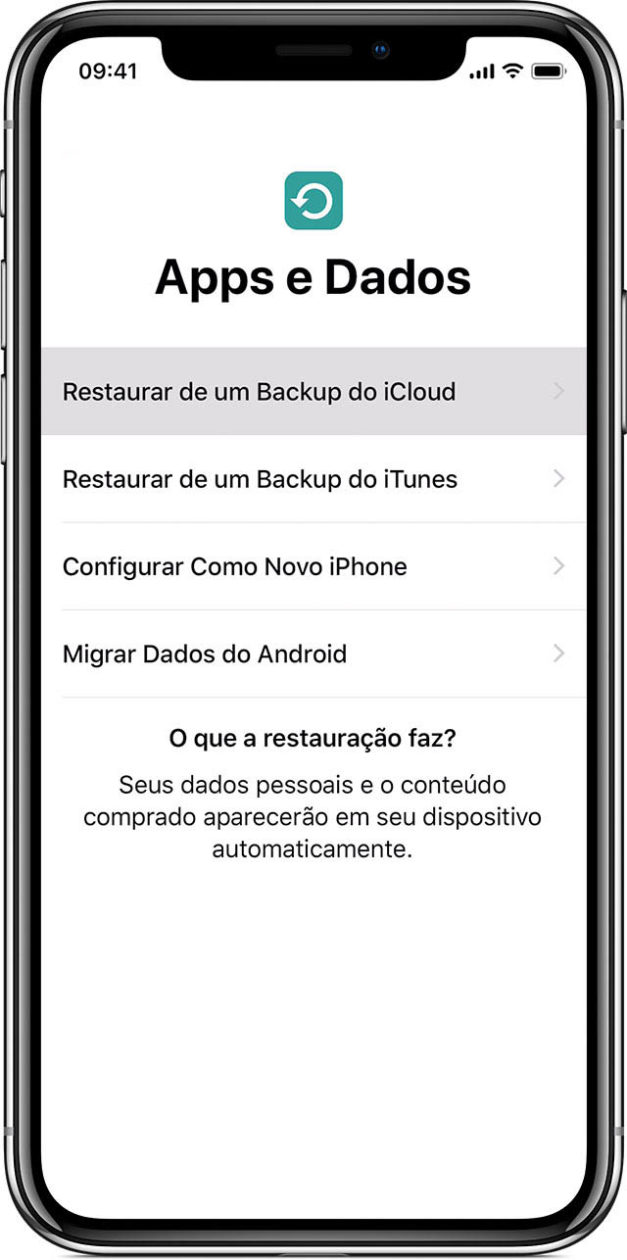
With a successful backup, just start your new iPhone, log into your iCloud account and, during Quick Start setup, select the option “Restore from iCloud Backup” in the “Apps and Data” step.

That done, just wait for the transfer process to finish and then finish the initial iPhone configuration. Apple remembers that if you’ve purchased content from iTunes or the App Store using multiple Apple IDs, you’ll need to sign in to each one.
It is also important to note that your data and media will not appear immediately after iCloud is backed up to the new device – it may take a few hours (or even days) for everything to “get on track”, but you can use the device normally during this process.
Transfer data by bringing devices closer together
Apple has implemented a new option to migrate data between devices on iOS 12.4, which only requires that they are close to each other (and connected to the same Wi-Fi network) – very convenient if you don’t have a backup of your old device and please configure the new one with practicality.
To migrate the data in this way, place the previous iPhone next to the new one throughout the process, while following the next steps. Remember to keep both devices connected to the power, so that the process is not interrupted due to lack of battery.

- Turn on the new iPhone and connect it to the Wi-Fi network; then bring the old device closer to the new one.
- Wait for an animation to appear on the new iPhone. Position the current iPhone camera over the animation and wait until the message “Finish on New iPhone” appears.
- When prompted, enter the current iPhone passcode on the new device and follow the instructions to set up Face ID or Touch ID.
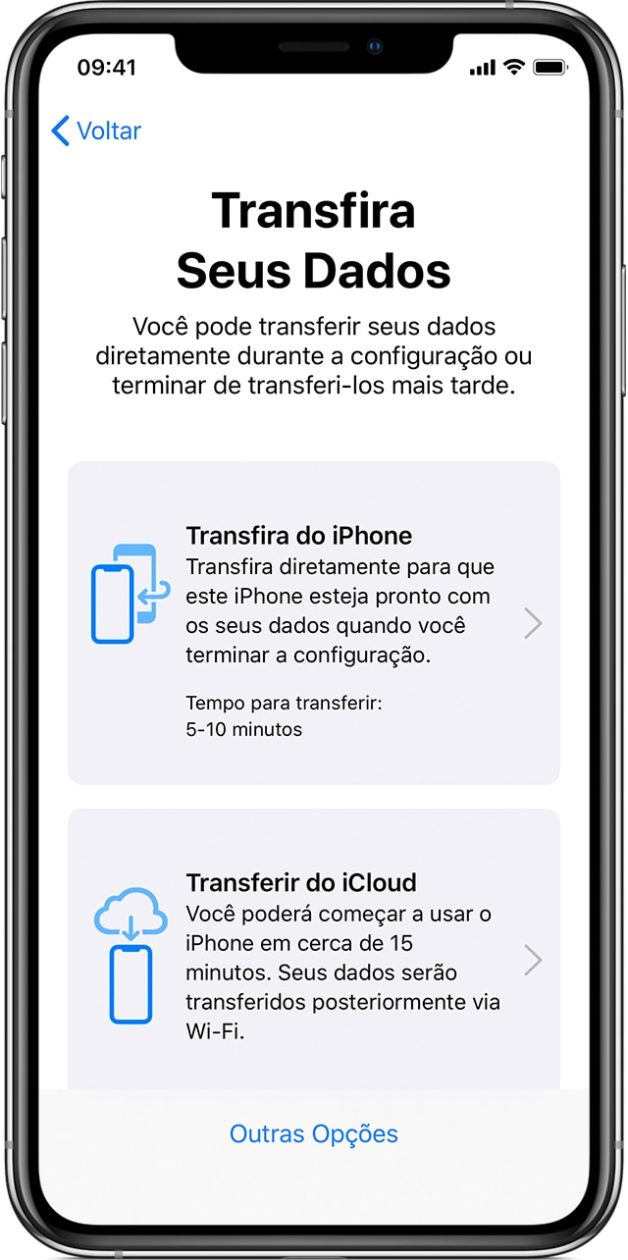
- Tap “Transfer from iPhone” to start transferring data from the previous iPhone to the new iPhone.
- Keep the devices close to each other until the data migration process is complete. The transfer time can vary depending on factors such as: type of connection, network conditions and amount of data.
The benefits of direct transfer is that this method does not depend on iCloud (and, consequently, on the amount of storage you have); in addition, it is possible to transfer data that is not part of iCloud Backup (but is in the cloud, not linked to your Apple ID), such as health data, apps and settings.
Transfer data with a wired connection
This, perhaps, is the least practical method of all – contradictory. Precisely because it needs a wired connection and the fact that iPhones only have a Lightning connector. Since a Lightning to Lightning data cable does not yet exist, you need to bridge the devices in another way.
Therefore, to migrate data using a wired connection, you will need the Lightning to camera adapter with USB 3 and a Lightning to USB cable. With at least R $ 500 of adapters / cables in hand, connect the Lightning to USB 3 camera adapter to the current iPhone and then the Lightning to USB cable to the new iPhone; then connect the other end to the adapter. Finally, connect the Lightning to camera adapter with USB 3 to power the Lightning port with a power adapter.
If you are using the wired method, the transfer icon will indicate that the devices are connected. That done, just follow up to step 4 above and finish the configuration process; it is also possible to transfer some settings from the previous iPhone to the new one, such as Apple Pay and Siri.
· • ·
Did it work? We hope so! If the reason for the configuration was a new iPhone, enjoy your device! Check out other tips and tutorials here.
