We understand: you don't handle waiting well. You wanted to take advantage of the new features and Dark Mode first macOS Mojave, so it took advantage of the launch of the first public beta of the new system to exercise its inalienable right to agitation, but things did not work out.
The first test version of Mojave, like any self-respecting initial beta, is still unstable; in some cases, it may be completely unusable for users who have had the audacity to install it on their single Mac, or the one that is used for work and daily use after all, just one inconsistency with an important app for the experiment to go down the drain .
Fortunately, it is easy to return to the (relative, at least) stability of the macOS High Sierra. Next, we take the path of the stones.
Backup your files
As with any operation that involves erasing an HDD / SSD, here it is essential that you make a backup of all your files. If you have a Time Machine backup done before upgrading to Mojave (which is highly recommended), just save the files you have created or modified during the beta usage period; otherwise, save everything after all, everything will be summarily erased.
Restart your Mac in mode Internet Recovery
Restart your Mac and, while the screen is black, press the R keys. Release the keys when the Apple logo appears on the screen. Remember that if you are going to restore a Time Machine backup, the disk containing the image must be connected at the time of restart.
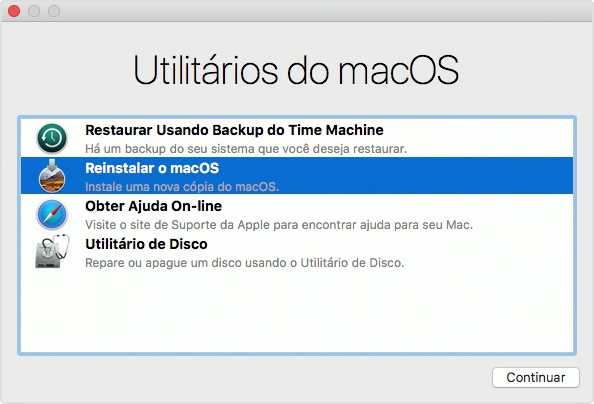
At the "Utilities" screen, select the "Disk Utility" option to erase the disk containing the beta version of macOS Mojave. Select the disk in question in the sidebar and click on the "Erase" tab above. Name your disc (for example, “Macintosh HD”) and select the format (if the disc is an HDD, select Mac OS X Extended (Journaled); if it is an SSD, select APFS).
Then go back to the "Utilities" screen and click "Restore Using Time Machine Backup". Select the most recent backup from the list (make sure the “macOS version” column shows 10.13, which is the High Sierra version number) and click “Continue”. Ready! A few or many minutes later, your Mac will return to the state it was in before the upgrade to Mojave. Now, just copy back the files that you saved before restoring.
If you do not have a Time Machine backup, simply select the option "Reinstall macOS" on the "Utilities" screen. The tool downloads the High Sierra installer to cleanly install the system; once the process is complete, copy your files back to your computer.
How to prevent macOS Mojave betas from installing automatically
If you are part of the Apple Beta Software Program, your Mac will receive the new Mojave betas automatically. To prevent this from happening, just go to App Store System Preferences and find the area that says "Your computer is scheduled to receive beta software updates". There, click on “Change” and confirm your choice. Ready, no more betas installed automatically!
· • ·
We hope today's tips have been helpful and, for any additional questions, the comment section below can be of great use. See you next time! 😉
