Special collaboration by Bruno Lopes.
Having an external hard drive is very useful for making backups, but using the same hard drive on a Mac and a PC can be an inglorious battle. The reason is that each operating system organizes data according to its own method, called the file system.

But fortunately, there is more than one solution to this stalemate, each with particular advantages and disadvantages.
Solution I: sacrifice performance
This is a solution adopted by many manufacturers of pendrives and external hard drives: they leave the factory formatted in the FAT32 system. It is the successor to the file systems used in DOS, FAT12 and FAT16 and was used in Microsoft Windows 95 OSR2, Windows 98 and Windows Me (does anyone remember the existence of the latter? :-P). As it is an old system, Mac OS X and Linux support writing and reading on FAT32, which allows the same disk to be read on almost any computer.
But this solution can be the source of more problems. Time Machine, for example, cannot be used with a hard disk formatted in FAT32 (in fact, it only works with hard drives in HFS format). Microsoft itself seems to be ashamed of FAT32 and considers that the best place for it is a museum, since it is not recommended for use on large-capacity disks, indicating the latest NTFS system.
Solution II: install translators
That's right, even if Windows and Mac OS X don't understand each other very well, it is still possible to make one understand the other's file system. One possibility to make Windows support HFS +; the other to make Mac OS X support NTFS. The problem is that you are unable to use the external drive on a different PC or Mac that does not have this program installed.
- On the PC: MacDrive is a good program, and with it you can read and write to HFS + disks. Unfortunately, it costs almost $ 50. The HFSExplorer is free, but in contrast to it you can only read HFS + volumes, not write. When Mac OS X 10.6 Snow Leopard is released, it will come with drivers for Windows that will allow reading of HFS + disks, but not writing. Anyway, these three tips are also interesting for those who use Windows on Mac, via Boot Camp, and want to have access to the files on the HFS partition on the disk.
- On Mac: Mac OS X 10.5 supports reading from NTFS disks (one less problem!), but not writing. With NTFS for Mac you can also have write access, paying $ 30. Those who do not like to spend money, need to install NTFS-3G, which may not have the same performance. The use of an external disk in NTFS format with the Mac, however, prevents the use of Time Machine, which requires an HFS + disk.
Solution III: split the disk
The best solution for me was to divide the disk into more than one partition, which the operating system sees as different disks. The largest would be with an HFS + system (to be used on Time Machine) and the smallest with a FAT32 system (to be used with the PC and to facilitate the exchange of files between the two systems). Creating two parties was easy, but formatting this second partition in FAT32, not so much.
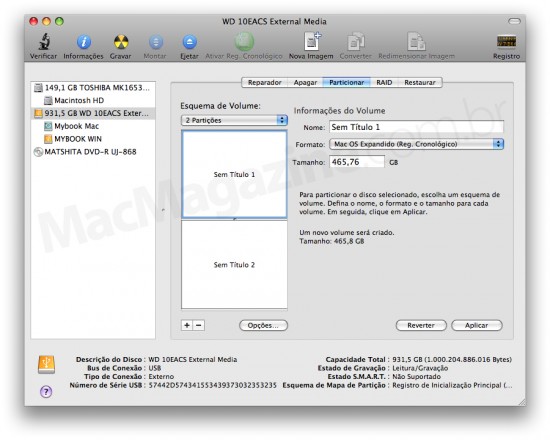
To create two parties on the external disk, the Disk Utility (Disk Utility) for Mac OS X quickly and efficiently. Click on the drawing that represents the disk, press the button “Partition and choose the number and size of parties you want. When creating an HFS partition, choose the option Mac OS Expanded (Chronological Reg.). Refer to this Apple support document if you have any questions.

The utility also creates parties in the FAT format, but they were simply not recognized by Windows when I connected the external disk to the PCs. That meant I was in a trap: Microsoft's disk formatting tool only formats disks up to 32GB in size. FAT format from now on, Windows only formats NTFS disks (which is why Boot Camp suggests that you create parties up to a maximum of 32GB).
The way out was to use the PC. There are many commercial and free programs that create and format parties, but what seemed to me the best was EASEUS Partition Master. It has the quality of a commercial program, but free for home use. just connect the disk to the computer, turn on the program and format the partition of the size you want in the FAT32 format (taking care not to touch the HFS + partition).
. . .
this, guys. Does anyone have any other tips to share with us?
